Linux
- chmod
- chmod 400 file - Read by owner
- chmod 040 file - Read by group
- chmod 004 file - Read by world

- chmod 200 file - Write by owner
- chmod 020 file - Write by group
- chmod 002 file - Write by world

- chmod 100 file - execute by owner
- chmod 010 file - execute by group
- chmod 001 file - execute by world

- chmod 444 file - Allow read permission to owner and group and world
- chmod 777 file - Allow everyone to read, write, and execute file
ARCH Linux Setup
-
Setup WIFI
iwctlstation wlan0 get-networks station wlan0 connect <Network name> -
Arch Install
- GUI
archinstall
or
-
CLI
Create partition
cfdisk /dev/nvme0n1

800 M for EFI System
> 20 GB for Linux filesystem
... for Linux swap
Format
mkfs.fat -F32 /dev/<EFI System>
mkfs.ext4 /dev/<Linux filesystem>
mkswap /dev/<swap>
Mount
#root
mount /dev/<linux filesystem /mnt
mkdir /mnt/boot
mount /dev/<EFI system> /mnt/boot
swapon /dev/<swap>
Install
pacstrap -i /mnt base base-devel linux-zen linux-firmware git sudo neofetch htop intel-ucode nano vim bluez bluez-utils networkmanagergenfstab -U /mnt >> /mnt/etc/fstab cat /mnt/etc/fstabEnter the system
arch-chroot /mnt

# change root password
passwd

# create user
useradd -m -g users -G wheel,storage,power,video,audio -s /bin/bash <username>
passwd <username>

EDITOR=vim visudo
# uncomment line %wheel ALL=(ALL:ALL) ALL
Timezone
ln -sf /usr/share/zoneinfo/... /etc/localtime
hwclock --systohc
vim /etc/locale.gen #uncomment en_US ...
locale-gen
vim /etc/locale.conf # add "LANG=en_US.UTF-8
Hostname
vim /etc/hostname # add hostname

vim /etc/hosts
# add this line:
127.0.0.1   localhost
::1         localhost
127.0.1.1    <hostname>.localdomain   <hostname>
Bootloader
pacman -S grub efibootmgr dosfstools mtools

grub-install --traget=x86_64-efi --efi-directory=/boot --bootloader-id=GRUB
grub-mkconfig -o /boot/grub/grub.cfg
Finish
systemctl enable bluetooth
systemctl enable NetworkManager
exit
umount -lR /mnt
- GUI
Unplug the USB drive and boot to the system
-
Setup Enable radio wifi
nmcli dev status
nmcli radio wifi on
nmcli dev wifi list
sudo nmcli dev wifi connect <name> password "<password>"

# update
sudo pacman -Syu
Install Desktop GUI
sudo pacman -S xorg sddm plasma-meta plasma-workspace kde-applications sudo systemctl enable sddm sudo systemctl start sddm -
Fix Backend Fix Discover App
sudo pacman -Sy flatpakInstall Nvidia Driver
lspci | grep -E "NVIDIA" sudo pacman -Sy nvidia -
Edit boot loader
sudo pacman -Sy os-prober sudo vim /etc/default/grub # change following line # GRUB_TIMEOUT=20 # uncomment GRUB_DISABLE_OS_PROBER=false sudo grub-mkconfig -o /boot/grub/grub.cfg -
Chinese Character and Keyboard
sudo pacman -S noto-fonts noto-fonts-cjk noto-fonts-extra noto-fonts-emoji ttf-dejavu ttf-liberation
sudo pacman -S fcitx5-im fcitx5-rime

cd ~/.local/share/fcitx5/rime
git clone https://github.com/iDvel/rime-ice.git
cp -r ./rime-ice/* .
SSH Configuration
-
RSA
- RSA keys have been the default for many years and are supported by almost all SSH clients and servers. They are well-understood and trusted in various computing environments. Many systems default to RSA key lengths of 2048 or 3072 bits, though some users prefer 4096 bits for enhanced security.
ssh-keygen -t rsa -b 4096 -C "your_email@example.com"
- RSA keys have been the default for many years and are supported by almost all SSH clients and servers. They are well-understood and trusted in various computing environments. Many systems default to RSA key lengths of 2048 or 3072 bits, though some users prefer 4096 bits for enhanced security.
-
Ed25519
- Ed25519 is increasingly popular due to its strong security features and efficiency. It uses elliptic curve cryptography to provide excellent security with shorter keys, resulting in faster performance and less data usage during authentication. Many modern systems and security guidelines now recommend Ed25519 as the preferred choice for new key generation.
ssh-keygen -t ed25519 -C "your_email@example.com"
- Ed25519 is increasingly popular due to its strong security features and efficiency. It uses elliptic curve cryptography to provide excellent security with shorter keys, resulting in faster performance and less data usage during authentication. Many modern systems and security guidelines now recommend Ed25519 as the preferred choice for new key generation.
-
ECDSA
- ECDSA is another commonly used type, particularly because it also offers good security with shorter key lengths compared to RSA. It’s often used where there’s a need for a balance between compatibility and modern cryptographic practices. ECDSA keys using the NIST P-256 curve (nistp256) are particularly common.
ssh-keygen -t ecdsa -b 256 -C "your_email@example.com"
- ECDSA is another commonly used type, particularly because it also offers good security with shorter key lengths compared to RSA. It’s often used where there’s a need for a balance between compatibility and modern cryptographic practices. ECDSA keys using the NIST P-256 curve (nistp256) are particularly common.
- note: RSA and Ed25519 are generally the most recommended, with Ed25519 often preferred for new deployments due to its robustness and efficiency. RSA remains widely used due to its long history and broad support across older and legacy systems. For new systems or updates, transitioning to Ed25519 from RSA or ECDSA is a common recommendation for enhanced security and performance.
-
Server Config
- copy and paste the public keys to the authorized_keys file on the server.
echo "paste-your-public-key-here" >> ~/.ssh/authorized_keys
chmod 600 ~/.ssh/authorized_keys
- copy and paste the public keys to the authorized_keys file on the server.
-
Local Config
- create a config file in .ssh folder
Host "custom name" HostName "hostname -after @" User "username" IdentityFile "private key location" - after configuration use the following command to connect to the server
ssh "custom name"
- create a config file in .ssh folder
Install Ansible
- Initializing
- Create a folder inventory with a hosts file in it
[server] # group name {ip address} {server name} - Try to ping the servers with password
ansible -i ./inventory/hosts server -m ping --user sysadmin --ask-pass - Create a folder playboos and has a yaml file apt.yml in it
- hosts: "*" become: tasks: - name: apt apt: update_cache: yes upgrade: 'yes' - Run the playbook
ansible-playbook ./playbooks/apt.yml --user serveradmin --ask-pass --ask-become-pass -i ./inventory/hosts - Create a file qemu-get-agent.yml under playbooks to install a module
- name: install latest qemu-guest-agent hosts: "*" tasks: - name: install qemu-guest-agent apt: name: qemu-guest-agent state: present update_cache: true become: true - Add the mattermost playbook
---
- name: Install Mattermost Server
  hosts: all
  become: yes
  vars:
    mattermost_version: 5.31.0
    mattermost_db_name: mattermost
    mattermost_db_user: mmuser
    mattermost_db_password: mmuser_password

  tasks:
    - name: Install necessary packages
      apt:
        name: "{{ item }}"
        state: present
      with_items:
        - git
        - nginx
        - postgresql
        - postgresql-contrib

    - name: Create Mattermost user
      user:
        name: mattermost
        state: present

    - name: Clone Mattermost server
      git:
        repo: 'https://github.com/mattermost/mattermost-server.git'
        dest: "/opt/mattermost-server"
        version: "v{{ mattermost_version }}"
      become: yes
      become_user: mattermost

    - name: Configure PostgreSQL
      block:
        - name: Create Mattermost database
          postgresql_db:
            name: "{{ mattermost_db_name }}"
            login_user: postgres

        - name: Create Mattermost database user
          postgresql_user:
            db: "{{ mattermost_db_name }}"
            name: "{{ mattermost_db_user }}"
            password: "{{ mattermost_db_password }}"
            priv: ALL
            login_user: postgres

    - name: Set up Mattermost configuration
      template:
        src: mattermost_config.json.j2
        dest: "/opt/mattermost-server/config/config.json"
        owner: mattermost
        mode: '0644'

    - name: Start Mattermost service
      systemd:
        name: mattermost
        state: started
        enabled: yes
- Create a folder inventory with a hosts file in it
Virtual Machine with Vagrant
-
Download and Install Tools
- Download and install VirtualBox from the Official VirtualBox website.
- Download and install Vagrant from the Official Vagrant website.
-
Get the Linux Box from Vagrant Cloud
- Visit Vagrant Cloud to find a suitable Linux box. Alternatively, you can add a Linux box directly using the command line:
Replacevagrant box add [box_name][box_name]with the name of the Linux box you want to use.
- Visit Vagrant Cloud to find a suitable Linux box. Alternatively, you can add a Linux box directly using the command line:
-
Initialize Vagrant Environment
- Initialize the VM with the following command:
Again, replacevagrant init [box_name][box_name]with the name of your chosen box.
- Initialize the VM with the following command:
-
Start the Virtual Machine
- Start the VM with:
vagrant up
- Start the VM with:
-
Check Installed Linux Box Version
- To check the installed Linux version and other boxes, use:
vagrant box list
- To check the installed Linux version and other boxes, use:
-
Connect to VM
- Connect to your VM via SSH using:
vagrant ssh
- Connect to your VM via SSH using:
-
Disconnect to VM
- suspend the VM
vagrant suspend - resume from suspend
vagrant resume - shutdown the VM
vagrant halt
- suspend the VM
Add on features for Linux app
-
NeoVim Setup
Requirements:
- Install Nerd font first
wget https://github.com/ryanoasis/nerd-fonts/releases/download/v3.2.1/Hack.zip unzip Hack.zip mkdir -p ~/.local/share/fonts sudo cp Hack/*.ttf ~/.local/share/fonts/ fc-cache -fv - Install npm
sudo apt install npm
git clone https://github.com/Henryfzh/documentation.git`gcc` - Toggles the current line using linewise comment `gbc` - Toggles the current line using blockwise comment `[count]gcc` - Toggles the number of line given as a prefix-count using linewise `[count]gbc` - Toggles the number of line given as a prefix-count using blockwise `gc[count]{motion}` - (Op-pending) Toggles the region using linewise comment `gb[count]{motion}` - (Op-pending) Toggles the region using blockwise comment - Install Nerd font first
-
Theme
Blur the windows:
mutter-rounded mutter-rounded setting -
mdBook
Requirements:
- Install Rust
cargo install mdbook
- Install Rust
-
tmux
Install TPM:
- Clone:
git clone https://github.com/tmux-plugins/tpm ~/.tmux/plugins/tpm - Create ~/.tmux.conf, and add following to it:
# List of plugins set -g @plugin 'tmux-plugins/tpm' set -g @plugin 'tmux-plugins/tmux-sensible' set -g @plugin 'catppuccin/tmux' set -g @catppuccin_flavour 'mocha' run '~/.tmux/plugins/tpm/tpm' set -g default-terminal 'tmux-256color' set -g mouse on # 2. Copy‑mode feels like Vim setw -g mode-keys vi # h‑j‑k‑l in copy‑mode bind -T copy-mode-vi v send -X begin-selection bind -T copy-mode-vi y send -X copy-selection-and-cancel # 3. Quick pane movement with Ctrl‑h/j/k/l (same as Vim splits) bind -n C-h select-pane -L bind -n C-j select-pane -D bind -n C-k select-pane -U bind -n C-l select-pane -R # 4. Resize panes with Alt + arrows bind -n M-Left resize-pane -L 5 bind -n M-Right resize-pane -R 5 bind -n M-Up resize-pane -U 2 bind -n M-Down resize-pane -D 2 # 5. Fast config reload: <prefix> r bind r source-file ~/.tmux.conf \; display-message "✔ tmux.conf reloaded" # 6. Shorter escape delay (makes Vim feel snappier inside tmux) set -s escape-time 0 - Install
ctrl + B, I - Reload:
tmux source ~/.tmux.conf
- Clone:
-
zsh fuzzy finder
fzf.zshrc plugins
powerlevel10kcopypath copyfile copybufferflatpak zsh on VSCode, add the lines to settings.json on VSCode
"terminal.integrated.defaultProfile.linux": "bash",
 "terminal.integrated.profiles.linux": {
   "bash": {
     "path": "/usr/bin/flatpak-spawn",
     "overrideName": true,
     "args": ["--host", "--env=TERM=xterm-256color", "zsh"]
   }
 },
Docker Basics
-
Build
sudo docker -t <target-name> -f Dockerfile . -
Run
- With bash
sudo docker run --rm -it --device /dev/kfd --device /dev/dri --security-opt seccomp=unconfined <target-name> /bin/bash - Without bash
sudo docker run --rm --device /dev/kfd --device /dev/dri --security-opt seccomp=unconfined rochpl.6.0 mpirun_rochpl -P 1 -Q 1 -N 45312 - Mount a Directory
sudo docker run --rm -it --device /dev/kfd --device /dev/dri --security-opt seccomp=unconfined --network host --name rochpl_node -v <directory>:/opt rochpl /usr/sbin/sshd -D
- With bash
-
Update Docker
- commit the changes
docker ps # to get the container iddocker commit <containerID> <imageid>
- commit the changes
-
Clean
# remove all images
sudo docker system prune -a
sudo docker container prune
sudo docker buildx prune -f
High Performance Linpack
- Install OpenMPI
- Download and unzip
wget https://download.open-mpi.org/release/open-mpi/v5.0/openmpi-5.0.6.tar.gz tar xzf openmpi-5.0.6.tar.gz cd openmpi-5.0.6/ - Compile
Preferably installed at “/usr/local/” but require sudo access./configure --prefix=<OPENMPI_INSTALL_DIRECTORY> make make install
- Download and unzip
- Install OpenBLAS
- Download and unzip
wget https://github.com/OpenMathLib/OpenBLAS/releases/download/v0.3.28/OpenBLAS-0.3.28.tar.gz tar xzf OpenBLAS-0.3.28.tar.gz cd OpenBLAS-0.3.28/ - Compile
Preferably installed at “/usr/local/” but require sudo accessmake make PREFIX=<OPEN_BLAS_INSTALL_DIRECTORY> install
- Download and unzip
- Update Path
- Update path to OpenMPI and OpenBLAS in .bashrc or .zshrc
export PATH=<OPENMPI_INSTALL_DIRECTORY>/bin:$PATH
export LD_LIBRARY_PATH=<OPENMPI_INSTALL_DIRECTORY>/lib:$LD_LIBRARY_PATH
export LD_LIBRARY_PATH=<OPEN_BLAS_INSTALL_DIRECTORY>/lib:$LD_LIBRARY_PATH
orsource ~/.bashrcsource ~/.zshrc
- Update path to OpenMPI and OpenBLAS in .bashrc or .zshrc
- Download HPL
- Using wget or curl download from official website:
orwget http://www.netlib.org/benchmark/hpl/hpl-2.3.tar.gzcurl -O http://www.netlib.org/benchmark/hpl/hpl-2.3.tar.gz - Unzip
tar -xf hpl-2.3.tar.gz
1. Compile with CPU
2. Compile with AMD GPU
- Using wget or curl download from official website:
High Performance Linpack with CPU
- Compile HPL
- Copy the template Makefile:
cp setup/Make.Linux_Intel64 Make.Linux_Intel64 - Edit the make file and change following lines:
TOPdir = <hpl-2.3 top folder directory> MPdir = <openmpi file directory> MPinc = -I$(MPdir)/include MPlib = -L$(MPdir)/lib -lmpi LAdir = <openblas file directory> LAinc = -I$(LAdir)/include LAlib = $(LAdir)/lib/libopenblas.a CC = mpicc CCNOOPT = $(HPL_DEFS) CCFLAGS = $(HPL_DEFS) -O3 -w -z noexecstack -z relro -z now -Wall # modify this according to the cpu LINKFLAGS = $(CCFLAGS) $(OMP_DEFS) - Compile
make arch=Linux_Intel64 - If you want to clean:
make clean arch=Linux_Intel64
- Copy the template Makefile:
- Run HPL
-
Edit the file bin/Linux_Intel64/HPL.dat inside the top folder.
Here is an example with 8GB RAM and 4 Cores CPU:HPLinpack benchmark input file Innovative Computing Laboratory, University of Tennessee HPL.out output file name (if any) 6 device out (6=stdout,7=stderr,file) 1 # of problems sizes (N) 29184 Ns 1 # of NBs 192 NBs 0 PMAP process mapping (0=Row-,1=Column-major) 1 # of process grids (P x Q) 2 Ps 2 Qs 16.0 threshold 1 # of panel fact 2 PFACTs (0=left, 1=Crout, 2=Right) 1 # of recursive stopping criterium 4 NBMINs (>= 1) 1 # of panels in recursion 2 NDIVs 1 # of recursive panel fact. 1 RFACTs (0=left, 1=Crout, 2=Right) 1 # of broadcast 1 BCASTs (0=1rg,1=1rM,2=2rg,3=2rM,4=Lng,5=LnM) 1 # of lookahead depth 1 DEPTHs (>=0) 2 SWAP (0=bin-exch,1=long,2=mix) 64 swapping threshold 0 L1 in (0=transposed,1=no-transposed) form 0 U in (0=transposed,1=no-transposed) form 1 Equilibration (0=no,1=yes) 8 memory alignment in double (> 0) ##### This line (no. 32) is ignored (it serves as a separator). ###### 0 Number of additional problem sizes for PTRANS 1200 10000 30000 values of N 0 number of additional blocking sizes for PTRANS 40 9 8 13 13 20 16 32 64 values of NB -
To tune the parameters, can reference the website here. It is not guaranteed to be the optimized setup. Try to tune the parameter by yourself.
The following parameters are probably you need to tune:
- Ps * Qs: the number of cores
- Ns: the problem size
- NBs: the block size
-
Run benchmark
mpirun -np <number of cores> ./xhpl
-
High Performance Linpack with AMD GPU
Prepare (Download the Dockerfile)
Dockerfile for AMD GPU
1. Build Dockerfile
sudo docker build -t rochpl -f Dockerfile .
2. Setup Docker image
- Node A
docker save -o rochpl_image.tar rochpl scp rochpl_image.tar user@10.0.0.12:~ - Node B
docker load -i ~/rochpl_image.tar - Both nodes
sudo docker run --rm -it \ --device /dev/kfd \ --device /dev/dri \ --security-opt seccomp=unconfined \ --network=host \ --name=rochpl_node \ rochpl /bin/bash - Setup SSH keys
# Both Nodes
ssh-keygen -t rsa -f ~/.ssh/id_rsa -q -N ""
# Both Nodes vim /etc/ssh/sshd_config # change the line --- PasswordAuthentication yes # add this line --- PermitRootLogin yes# Node A ssh-copy-id -p 2222 root@10.0.0.12# Node B ssh-copy-id -p 2222 root@10.0.0.14 - Add following to both nodes
vim ~/.ssh/configHost 10.0.0.14 Port 2222 User root Host 10.0.0.12 Port 2222 User root- Test if it works
ssh 10.0.0.14 hostname
- Test if it works
3. Run HPL
- Add the rochpl_hostfile on both node
10.0.0.14 slots=4 10.0.0.12 slots=4 - Run HPL using this command (modify the arguments to suit your environment)
export OMPI_MCA_pmix=pmixmpirun --hostfile rochpl_hostfile -np 8 --bind-to none -x HIP_VISIBLE_DEVICES=0,1,2,3 --mca pml ucx --mca btl ^vader,tcp,openib,uct ./run_rochpl -P 2 -Q 4 -N 256000 --NB 512
Dockerfile(AMD)
ARG UBUNTU_VERSION="jammy"

FROM ubuntu:${UBUNTU_VERSION}

ARG ROCM_URL="https://repo.radeon.com/amdgpu-install/6.1.1/ubuntu/jammy/amdgpu-install_6.1.60101-1_all.deb"
ARG UCX_BRANCH="v1.16.0"
ARG UCC_BRANCH="v1.3.0"
ARG OMPI_BRANCH="v5.0.3"
ARG APT_GET_APPS=""
ARG GPU_TARGET="gfx908,gfx90a,gfx942"

# Update and Install basic Linux development tools
RUN apt-get update \
    && DEBIAN_FRONTEND=noninteractive apt-get install -y --no-install-recommends \
        ca-certificates \
        git \
        ssh \
	openssh-client \
	openssh-server \
        make \
        vim \
        nano \
        libtinfo-dev\
        initramfs-tools \
        libelf-dev \
        numactl \
        curl \
        wget \
        tmux \
        build-essential \
        autoconf \
        automake \
        libtool \
        pkg-config \
        libnuma-dev \
        gfortran \
        flex \
        hwloc \
        libstdc++-12-dev \
        libxml2-dev \
        python3-dev \
        python3-pip \
        python3-distutils \
        unzip ${APT_GET_APPS}\
    && apt-get clean

RUN wget -qO- https://repo.radeon.com/rocm/rocm.gpg.key | gpg --dearmor | tee /etc/apt/trusted.gpg.d/rocm.gpg \
    && wget -O rocm.deb ${ROCM_URL} \
    && apt install -y ./rocm.deb \
    && amdgpu-install --usecase=rocm,hiplibsdk --no-dkms -y

RUN bash -c """IFS=',' read -r -a ARCH <<<${GPU_TARGET} \
        &&  for gpu_arch in \${ARCH[@]}; do \
            echo \$gpu_arch  >> /opt/rocm/bin/target.lst; \
        done""" \
    && chmod a+r /opt/rocm/bin/target.lst

# # Requires cmake > 3.22
RUN mkdir -p /opt/cmake  \
  && wget --no-check-certificate --quiet -O - https://cmake.org/files/v3.27/cmake-3.27.7-linux-x86_64.tar.gz | tar --strip-components=1 -xz -C /opt/cmake

ENV ROCM_PATH=/opt/rocm \
    UCX_PATH=/opt/ucx \
    UCC_PATH=/opt/ucc \
    OMPI_PATH=/opt/ompi \
    GPU_TARGET=${GPU_TARGET}

# Adding rocm/cmake to the Environment
ENV PATH=$ROCM_PATH/bin:/opt/cmake/bin:$PATH \
    LD_LIBRARY_PATH=$ROCM_PATH/lib:$ROCM_PATH/lib64:$ROCM_PATH/llvm/lib:$LD_LIBRARY_PATH \
    LIBRARY_PATH=$ROCM_PATH/lib:$ROCM_PATH/lib64:$LIBRARY_PATH \
    C_INCLUDE_PATH=$ROCM_PATH/include:$C_INCLUDE_PATH \
    CPLUS_INCLUDE_PATH=$ROCM_PATH/include:$CPLUS_INCLUDE_PATH \
    CMAKE_PREFIX_PATH=$ROCM_PATH/lib/cmake:$CMAKE_PREFIX_PATH

# Create the necessary directory for SSH
RUN mkdir /var/run/sshd

# Set root password for login
RUN echo 'root:redhat' | chpasswd

# Allow root login and password authentication
RUN sed -i 's/#PasswordAuthentication no/PasswordAuthentication yes/' /etc/ssh/sshd_config && \
    sed -i 's/PermitRootLogin prohibit-password/PermitRootLogin yes/' /etc/ssh/sshd_config && \
    echo "StrictModes no" >> /etc/ssh/sshd_config

# Change the SSH port to 2222
RUN sed -i 's/#Port 22/Port 2222/' /etc/ssh/sshd_config

# Expose the new SSH port
EXPOSE 2222

# Start the SSH service and keep the container running
ENTRYPOINT service ssh restart && bash

WORKDIR /tmp


# Install UCX
RUN git clone https://github.com/openucx/ucx.git -b ${UCX_BRANCH} \
    && cd ucx \
    && ./autogen.sh \
    && mkdir build \
    && cd build \
    && ../contrib/configure-release --prefix=$UCX_PATH \
        --with-rocm=$ROCM_PATH \
        --without-knem \
        --without-xpmem  \
        --without-cuda \
        --enable-optimizations  \
        --disable-logging \
        --disable-debug \
        --disable-examples \
    && make -j $(nproc)  \
    && make install

# Install UCC
RUN git clone -b ${UCC_BRANCH} https://github.com/openucx/ucc \
    && cd ucc \
    && ./autogen.sh \
    && sed -i 's/memoryType/type/g' ./src/components/mc/rocm/mc_rocm.c \
    # offload-arch=native builds the local architecutre, which may not be present at build time for a container.
    && sed -i 's/--offload-arch=native//g' ./cuda_lt.sh \
    && mkdir build \
    && cd build \
    && ../configure --prefix=${UCC_PATH} --with-rocm=${ROCM_PATH} --with-ucx=${UCX_PATH} --with-rccl=no  \
    && make -j $(nproc) \
    && make install


# Install OpenMPI
RUN git clone --recursive https://github.com/open-mpi/ompi.git -b ${OMPI_BRANCH} \
    && cd ompi \
    && ./autogen.pl \
    && mkdir build \
    && cd build \
    && ../configure --prefix=$OMPI_PATH --with-ucx=$UCX_PATH \
        --with-ucc=${UCC_PATH} \
        --enable-mca-no-build=btl-uct  \
        --without-verbs \
        --with-pmix=internal \
        --enable-mpi \
        --enable-mpi-fortran=yes \
        --disable-man-pages \
        --disable-debug \
    && make -j $(nproc) \
    && make install

# Adding OpenMPI, UCX, and UCC to Environment
ENV PATH=$OMPI_PATH/bin:$UCX_PATH/bin:$UCC_PATH/bin:$PATH \
    LD_LIBRARY_PATH=$OMPI_PATH/lib:$UCX_PATH/lib:$UCC_PATH/lib:$LD_LIBRARY_PATH \
    LIBRARY_PATH=$OMPI_PATH/lib:$UCX_PATH/lib:$UCC_PATH/lib:$LIBRARY_PATH \
    C_INCLUDE_PATH=$OMPI_PATH/include:$UCX_PATH/include:$UCC_PATH/include:$C_INCLUDE_PATH \
    CPLUS_INCLUDE_PATH=$OMPI_PATH/include:$UCX_PATH/include:$UCC_PATH/include:$CPLUS_INCLUDE_PATH \
    PKG_CONFIG_PATH=$OMPI_PATH/lib/pkgconfig:$UCX_PATH/lib/pkgconfig/:$PKG_CONFIG_PATH  \
    OMPI_ALLOW_RUN_AS_ROOT=1 \
    OMPI_ALLOW_RUN_AS_ROOT_CONFIRM=1 \
    UCX_WARN_UNUSED_ENV_VARS=n

# Install Additional Apps Below
ARG HPL_BRANCH="main"

WORKDIR /opt

# Installing rocHPL
RUN git clone -b ${HPL_BRANCH} https://github.com/ROCmSoftwarePlatform/rocHPL.git \
    && cd rocHPL \
    && ./install.sh \
        --prefix=/opt/rochpl \
        --with-rocm=/opt/rocm/ \
        --with-mpi=/opt/ompi \
    && rm -rf /tmp/rocHPL

ENV PATH=$PATH:/opt/rochpl:/opt/rochpl/bin
ENV HIP_VISIBLE_DEVICES=0,1,2,3


#CMD ["/usr/sbin/sshd", "-D"]
CMD ["/bin/bash"]
Machine Learning
Large Language Model (LLM) Training
Overview
Large Language Models (LLMs) are transformer-based neural networks trained on massive text corpora to understand and generate human-like text. Modern LLMs range from 7B to over 1T parameters.
Training Pipeline
1. Data Collection & Preprocessing
Modern Data Pipeline:
1. Web scraping (Common Crawl, Reddit, etc.)
2. Quality filtering (CCNet, Gopher rules)
3. Deduplication (MinHash, SimHash)
4. Toxicity filtering (Perspective API)
5. Multi-lingual processing
2. Tokenization
- Modern Tokenizers: SentencePiece, Tiktoken
- Vocabulary Sizes: 32K-256K tokens
- Special Tokens: BOS, EOS, padding, mask tokens
3. Pre-training
import torch
import torch.nn as nn
from transformers import (
    AutoTokenizer,
    AutoModelForCausalLM,
    TrainingArguments,
    Trainer,
    DataCollatorForLanguageModeling
)
from datasets import load_dataset
import os

# Configuration
model_name = "microsoft/DialoGPT-small"
output_dir = "./llm-training-output"

# Load tokenizer and model
tokenizer = AutoTokenizer.from_pretrained(model_name)
tokenizer.pad_token = tokenizer.eos_token  # Set pad token

model = AutoModelForCausalLM.from_pretrained(
    model_name,
    torch_dtype=torch.float16,
    device_map="auto"
)

# Load and prepare dataset
dataset = load_dataset("wikitext", "wikitext-2-raw-v1")

def tokenize_function(examples):
    return tokenizer(
        examples["text"],
        truncation=True,
        padding=False,
        max_length=512,
        return_tensors=None
    )

tokenized_datasets = dataset.map(
    tokenize_function,
    batched=True,
    remove_columns=dataset["train"].column_names
)

# Data collator for language modeling
data_collator = DataCollatorForLanguageModeling(
    tokenizer=tokenizer,
    mlm=False,  # Causal language modeling
    return_tensors="pt"
)

# Training arguments
training_args = TrainingArguments(
    output_dir=output_dir,
    overwrite_output_dir=True,
    num_train_epochs=3,
    per_device_train_batch_size=4,
    per_device_eval_batch_size=4,
    gradient_accumulation_steps=4,
    warmup_steps=500,
    learning_rate=5e-5,
    weight_decay=0.01,
    logging_steps=100,
    eval_steps=500,
    save_steps=1000,
    evaluation_strategy="steps",
    save_strategy="steps",
    load_best_model_at_end=True,
    metric_for_best_model="eval_loss",
    greater_is_better=False,
    fp16=True,  # Mixed precision training
    dataloader_pin_memory=False,
    report_to=None  # Disable wandb/tensorboard if not needed
)

# Create trainer
trainer = Trainer(
    model=model,
    args=training_args,
    train_dataset=tokenized_datasets["train"],
    eval_dataset=tokenized_datasets["validation"],
    data_collator=data_collator,
    tokenizer=tokenizer,
)

# Start training
print("Starting training...")
trainer.train()

# Save the final model
trainer.save_model()
tokenizer.save_pretrained(output_dir)
print(f"Training completed. Model saved to {output_dir}")

# Example inference
def generate_text(prompt, max_length=100):
    inputs = tokenizer.encode(prompt, return_tensors="pt")
    with torch.no_grad():
        outputs = model.generate(
            inputs,
            max_length=max_length,
            num_return_sequences=1,
            temperature=0.7,
            do_sample=True,
            pad_token_id=tokenizer.eos_token_id
        )
    return tokenizer.decode(outputs[0], skip_special_tokens=True)

# Test the trained model
test_prompt = "The future of artificial intelligence"
generated_text = generate_text(test_prompt)
print(f"Generated: {generated_text}")
Key Components Explained:
- Model Loading: Using pre-trained models from Hugging Face
- Data Preparation: Tokenization and dataset formatting
- Training Configuration: Modern training parameters with mixed precision
- Training Loop: Using Hugging Face Trainer for efficient training
- Evaluation: Built-in evaluation during training
- Inference: Text generation with the trained model
Modern Training Features:
- Mixed precision (FP16) for memory efficiency
- Gradient accumulation for effective batch size
- Warmup steps for stable training
- Automatic evaluation and checkpointing
- Device mapping for multi-GPU training
4. Instruction Tuning
- Supervised Fine-Tuning (SFT): High-quality instruction datasets
- Datasets: Alpaca, Dolly, OpenAssistant, ShareGPT
- Format: System/User/Assistant message structure
5. Alignment & Safety
- RLHF: Reinforcement Learning from Human Feedback
- DPO: Direct Preference Optimization (modern alternative)
- Constitutional AI: Anthropic’s safety-first approach
- RLAIF: Reinforcement Learning from AI Feedback
Modern Training Techniques
1. Efficient Training
- FlashAttention: Memory-efficient attention
- Mixed Precision: BF16/FP16 training
- Gradient Checkpointing: Memory vs computation trade-off
- Model Parallelism: Tensor, pipeline, sequence parallelism
2. Optimization Advances
- AdamW: Weight decay separated from gradient updates
- Lion: New optimizer with better convergence
- Cosine Annealing: Smooth learning rate decay
- Gradient Accumulation: Effective large batch training
3. Hardware Considerations
- GPUs: H100, A100, L40S for training
- Memory: NVLink for multi-GPU communication
- Storage: High-throughput distributed file systems
- Networking: InfiniBand for multi-node training
Evaluation & Benchmarks
1. Core Capabilities
- MMLU: Massive Multitask Language Understanding
- GSM8K: Grade school math reasoning
- HumanEval: Code generation
- HellaSwag: Commonsense reasoning
2. Safety & Alignment
- TruthfulQA: Truthfulness evaluation
- ToxiGen: Toxicity detection
- BBQ: Bias evaluation
Modern Training Frameworks
1. Open Source Options
- Transformers (Hugging Face): Model library and training
- Axolotl: Streamlined fine-tuning framework
- LLaMA-Factory: Easy fine-tuning interface
- DeepSpeed: Microsoft’s optimization library
- Megatron-LM: NVIDIA’s large-scale training framework
2. Commercial Platforms
- AWS SageMaker: Managed training service
- Google Vertex AI: GCP’s ML platform
- Azure ML: Microsoft’s cloud ML service
Resources
1. Key Papers
- Attention Is All You Need: Original transformer paper
- LLaMA: Open and Efficient Foundation Language Models: Meta’s efficient LLM architecture
- Training Language Models to Follow Instructions: InstructGPT/RLHF paper
- Direct Preference Optimization: DPO method for alignment
2. Frameworks & Libraries
- Hugging Face Transformers: Model library and training
- Axolotl: Streamlined fine-tuning framework
- DeepSpeed: Optimization library for large models
- Megatron-LM: Large-scale training framework
3. Datasets
- The Pile: Large-scale diverse text dataset
- C4: Colossal Clean Crawled Corpus
- RedPajama: Open reproduction of LLaMA training data
- Alpaca: Instruction-following dataset
4. Tools & Platforms
- Weights & Biases: Experiment tracking and visualization
- MLflow: Machine learning lifecycle platform
- Hugging Face Hub: Model repository and sharing
- OpenAI Evals: Evaluation framework for LLMs
5. Learning Resources
- Hugging Face Course: Free NLP and transformers course
- Stanford CS324: Large Language Models course
- LLM University: Cohere’s LLM learning platform
- Papers with Code: Latest research papers with implementations
Retrieval-Augmented Generation (RAG)
Overview
RAG combines information retrieval with text generation, allowing LLMs to access and use external knowledge sources to produce more accurate, up-to-date, and contextually relevant responses.
Modern RAG Architecture (2024-2025)
1. Core Components
┌─────────────────┐    ┌─────────────────┐    ┌─────────────────┐
│   Document      │    │   Vector Store  │    │   LLM with      │
│   Processing    │───▶│   & Retrieval   │───▶│   Generation    │
│                 │    │                 │    │                 │
└─────────────────┘    └─────────────────┘    └─────────────────┘
2. Advanced RAG Patterns
- Hybrid Search: Combining semantic + keyword search
- Multi-hop RAG: Iterative retrieval for complex queries
- Agentic RAG: LLM-driven retrieval and reasoning
- Graph RAG: Knowledge graph enhanced retrieval
Document Processing Pipeline
1. Document Loading
# Modern document loaders
from langchain_community.document_loaders import (
    PyPDFLoader,
    UnstructuredFileLoader,
    WebBaseLoader,
    DirectoryLoader
)

# Popular formats supported:
# - PDF, DOCX, PPTX
# - HTML, Markdown
# - CSV, JSON
# - Audio/Video (via transcription)
2. Text Splitting Strategies
from langchain.text_splitter import (
    RecursiveCharacterTextSplitter,
    SemanticChunkSplitter,
    MarkdownHeaderTextSplitter
)

# Modern chunking approaches:
text_splitter = RecursiveCharacterTextSplitter(
    chunk_size=1000,
    chunk_overlap=200,
    separators=["\n\n", "\n", ". ", " ", ""]
)
3. Embedding Generation
# Modern embedding models
from sentence_transformers import SentenceTransformer
from openai import OpenAI

# High-performance options:
# - text-embedding-3-large (OpenAI)
# - BGE-large-en-v1.5
# - E5-large-v2
# - Instructor-XL

embedder = SentenceTransformer('BAAI/bge-large-en-v1.5')
embeddings = embedder.encode(chunks)
Vector Databases & Retrieval
1. Modern Vector Databases
- Pinecone: Managed vector database
- Weaviate: Open-source with hybrid search
- Chroma: Lightweight, in-memory
- Qdrant: High-performance, Rust-based
- Milvus: Scalable for large datasets
2. Retrieval Strategies
# Hybrid search example
def hybrid_retrieval(query, vector_store, keyword_store, alpha=0.5):
    semantic_results = vector_store.similarity_search(query, k=10)
    keyword_results = keyword_store.search(query, k=10)

    # Combine scores
    combined_results = rerank_results(
        semantic_results, keyword_results, alpha
    )
    return combined_results[:5]
3. Advanced Retrieval Techniques
- Re-ranking: Cross-encoders for better ranking
- Query Expansion: Generate multiple query variations
- HyDE: Hypothetical Document Embeddings
- ColBERT: Contextualized late interaction
Generation & Integration
1. Prompt Engineering for RAG
# Modern RAG prompt template
RAG_PROMPT_TEMPLATE = """
You are a helpful assistant. Use the following context to answer the question.

Context:
{context}

Question: {question}

Answer the question based on the context above. If the context doesn't contain relevant information, say so and provide a general answer if possible.
"""
2. LLM Integration
from langchain.chains import RetrievalQA
from langchain_community.chat_models import ChatOpenAI

# Modern LLM choices for RAG:
llm = ChatOpenAI(
    model="gpt-4-turbo-preview",
    temperature=0.1,
    max_tokens=2000
)

rag_chain = RetrievalQA.from_chain_type(
    llm=llm,
    chain_type="stuff",
    retriever=vector_store.as_retriever()
)
Evaluation & Monitoring
1. RAG Evaluation Metrics
- Retrieval Metrics:
- Hit Rate, MRR (Mean Reciprocal Rank)
- NDCG (Normalized Discounted Cumulative Gain)
- Generation Metrics:
- Faithfulness, Answer Relevance
- Context Utilization
- End-to-End Metrics:
- User satisfaction, Task completion rate
2. Evaluation Frameworks
# RAGAS for automated evaluation
from ragas import evaluate
from ragas.metrics import (
    faithfulness,
    answer_relevance,
    context_recall,
    context_precision
)

results = evaluate(
    dataset=test_dataset,
    metrics=[faithfulness, answer_relevance]
)
Advanced RAG Techniques
1. Query Optimization
- Query Understanding: Intent classification
- Query Reformulation: LLM-based query rewriting
- Multi-query Generation: Create multiple search queries
2. Context Management
- Context Compression: Summarize retrieved documents
- Context Filtering: Remove irrelevant information
- Context Reordering: Prioritize most relevant chunks
3. Multi-modal RAG
- Image RAG: CLIP embeddings for visual search
- Audio RAG: Speech-to-text + text RAG
- Video RAG: Frame extraction + multimodal understanding
Modern RAG Frameworks & Tools
1. Open Source Frameworks
- LangChain/LangGraph: Comprehensive RAG framework
- LlamaIndex: Optimized for LLM data applications
- Haystack: End-to-end NLP framework
- DSPy: Programming model for LM applications
2. Commercial Platforms
- OpenAI Assistants: Built-in RAG capabilities
- Google Vertex AI Search: Enterprise RAG solution
- Azure AI Search: Microsoft’s cognitive search
- AWS Kendra: Intelligent document search
Implementation Best Practices
1. Data Quality
- Clean and preprocess documents thoroughly
- Implement proper chunking strategies
- Handle different document types appropriately
2. Retrieval Optimization
- Use hybrid search for better recall
- Implement re-ranking for precision
- Tune retrieval parameters (k, similarity threshold)
3. Generation Quality
- Design effective prompt templates
- Implement context window management
- Handle cases where context is insufficient
4. Performance & Scalability
- Use efficient embedding models
- Implement caching for frequent queries
- Monitor and optimize latency
Common Challenges & Solutions
1. Retrieval Failures
- Problem: Relevant documents not retrieved
- Solution: Hybrid search, query expansion, fine-tuned embeddings
2. Context Overload
- Problem: Too much irrelevant information
- Solution: Better chunking, context compression, re-ranking
3. Hallucinations
- Problem: LLM generates information not in context
- Solution: Better prompting, context verification, self-checking
4. Scalability Issues
- Problem: Slow performance with large document sets
- Solution: Efficient vector databases, indexing strategies, caching
Real-world Applications
1. Enterprise Knowledge Bases
- Internal documentation search
- Customer support automation
- Employee onboarding
2. Research & Education
- Academic paper analysis
- Educational content generation
- Research assistance
3. E-commerce & Customer Service
- Product information retrieval
- Customer query resolution
- Personalized recommendations
4. Healthcare & Legal
- Medical literature search
- Legal document analysis
- Compliance checking
Future Trends
1. Agentic RAG
- Autonomous research and synthesis
- Multi-step reasoning with retrieval
- Self-correcting systems
2. Multimodal Expansion
- Integration of images, audio, video
- Cross-modal retrieval and generation
- Unified multimodal understanding
3. Real-time RAG
- Streaming data integration
- Live knowledge updates
- Dynamic context adaptation
4. Federated RAG
- Privacy-preserving knowledge access
- Cross-organizational knowledge sharing
- Secure information retrieval
Code Example: Complete RAG Pipeline
import os
from langchain_community.document_loaders import PyPDFLoader
from langchain.text_splitter import RecursiveCharacterTextSplitter
from langchain_community.vectorstores import Chroma
from langchain_community.embeddings import HuggingFaceEmbeddings
from langchain.chains import RetrievalQA
from langchain_community.llms import OpenAI

# 1. Load documents
loader = PyPDFLoader("document.pdf")
documents = loader.load()

# 2. Split documents
text_splitter = RecursiveCharacterTextSplitter(
    chunk_size=1000,
    chunk_overlap=200
)
chunks = text_splitter.split_documents(documents)

# 3. Create embeddings and vector store
embeddings = HuggingFaceEmbeddings(
    model_name="BAAI/bge-large-en-v1.5"
)
vector_store = Chroma.from_documents(
    documents=chunks,
    embedding=embeddings,
    persist_directory="./chroma_db"
)

# 4. Create RAG chain
llm = OpenAI(temperature=0.1)
qa_chain = RetrievalQA.from_chain_type(
    llm=llm,
    chain_type="stuff",
    retriever=vector_store.as_retriever(search_kwargs={"k": 3})
)

# 5. Query the system
response = qa_chain.run("What is the main topic of this document?")
print(response)
Resources
- Frameworks: LangChain, LlamaIndex, Haystack
- Vector Databases: Pinecone, Weaviate, Chroma, Qdrant
- Embedding Models: OpenAI, Sentence Transformers, BGE
- Evaluation: RAGAS, TruLens, LangSmith
- Papers: “Retrieval-Augmented Generation for Knowledge-Intensive NLP Tasks”
Computer Vision
-
VGG16
- VGG16 has a total of 138 million parameters. The important point to note here is that all the conv kernels are of size 3x3 and maxpool kernels are of size 2x2 with a stride of two.
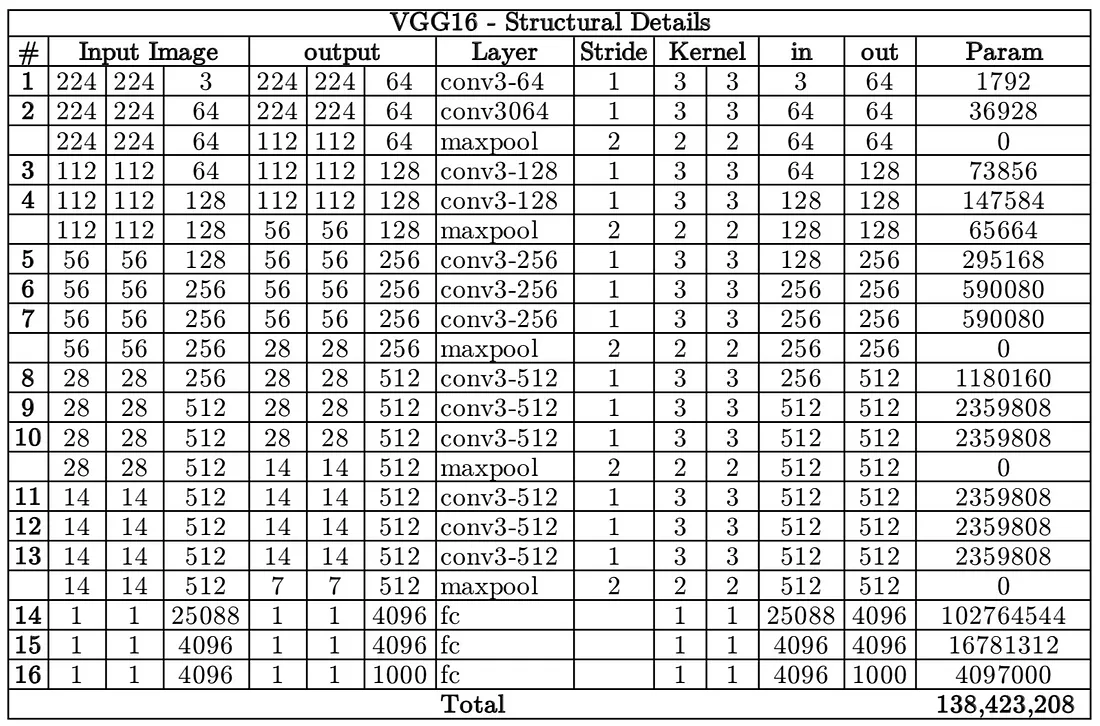
- VGG16 has a total of 138 million parameters. The important point to note here is that all the conv kernels are of size 3x3 and maxpool kernels are of size 2x2 with a stride of two.
-
ResNet
- Resnet18 has around 11 million trainable parameters. It consists of CONV layers with filters of size 3x3 (just like VGGNet). Only two pooling layers are used throughout the network one at the beginning and the other at the end of the network. Identity connections are between every two CONV layers. The solid arrows show identity shortcuts where the dimension of the input and output is the same, while the dotted ones present the projection connections where the dimensions differ.
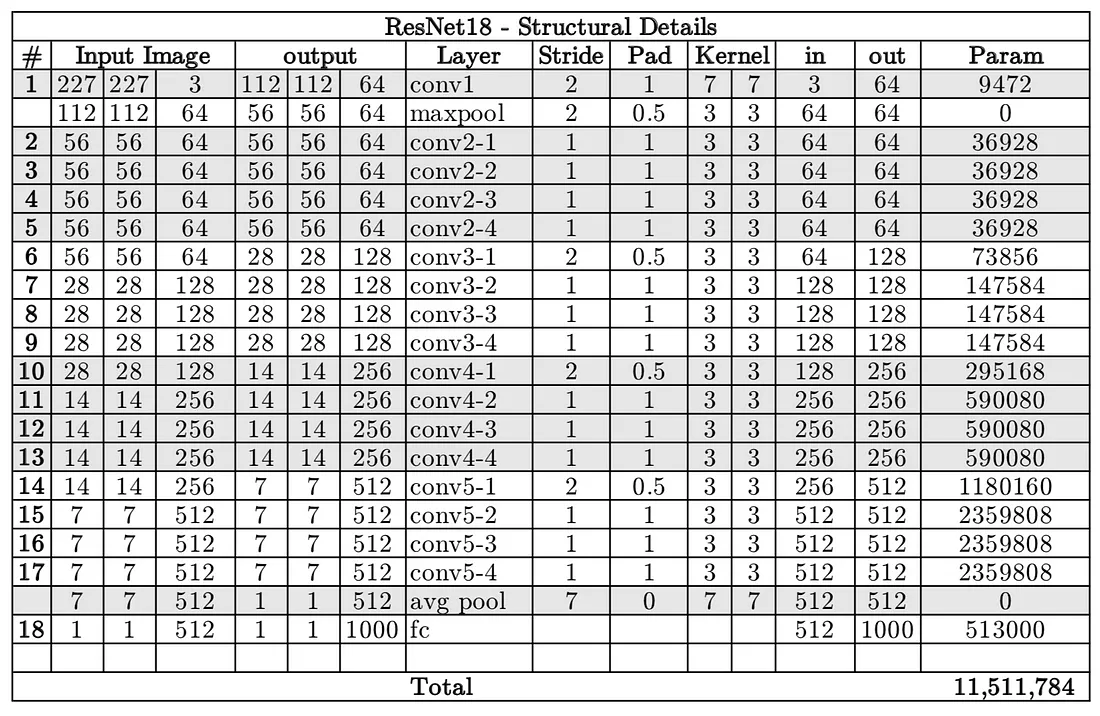
- Resnet18 has around 11 million trainable parameters. It consists of CONV layers with filters of size 3x3 (just like VGGNet). Only two pooling layers are used throughout the network one at the beginning and the other at the end of the network. Identity connections are between every two CONV layers. The solid arrows show identity shortcuts where the dimension of the input and output is the same, while the dotted ones present the projection connections where the dimensions differ.
-
Architecture Differences:
- VGG16: VGG16 is a deep convolutional network with a straightforward and uniform architecture, consisting of 16 layers with very small (3x3) convolution filters. It is known for its simplicity and has been a popular choice for image classification tasks.
- ResNet: ResNet, particularly ResNet-50, uses residual connections that help mitigate the vanishing gradient problem, allowing for the training of much deeper networks. ResNet architectures are typically deeper and more complex than VGG16, which generally results in better feature extraction and higher accuracy in many tasks.
-
Performance:
- Accuracy: ResNet models, due to their depth and residual connections, generally outperform VGG16 in many image recognition tasks, including object detection. They are able to learn more complex features and provide better accuracy.
- Computation and Memory: ResNet models are usually more computationally expensive and require more memory compared to VGG16. This can be a consideration if you have limited computational resources.
-
Application in Object Detection:
- Object detection frameworks such as Faster R-CNN, SSD, and YOLO have utilized both VGG and ResNet as backbone feature extractors. In many cases, ResNet-based models have shown better performance in terms of both precision and recall.
- For instance, Faster R-CNN with a ResNet-50 or ResNet-101 backbone generally performs better than the same framework with a VGG16 backbone.
Practical Considerations:
-
ResNet Advantages:
- Better accuracy and feature representation due to deeper network architecture.
- Residual connections help in training deeper networks, resulting in improved performance.
-
VGG16 Advantages:
- Simpler architecture which can be easier to implement and train.
- Less computationally intensive compared to ResNet.
Conclusion:
In general, ResNet models tend to be better than VGG16 for object detection tasks due to their superior feature extraction capabilities and higher accuracy. However, this comes at the cost of increased computational requirements.
If computational resources are not a constraint, it is recommended to use ResNet (e.g., ResNet-50 or ResNet-101) for better performance in object detection. However, if you need a simpler and less resource-intensive model, VGG16 is still a viable option and can achieve good results.